It’s going to do a rapid to the Y over the centerline of the fixture as you change the menu, IIRC. Because it shouldn’t be anywhere else.
@HelenH, here’s where you can see what’s going on with the rotary laser. If you’re interested in checking out where it’s at and troubleshooting some of the final kinks, this thread has good info and @J-LoM can probably spitball with you some.
Yes, that may explain the observed movements on the Y axis. It is possible that the way I loaded my pieces (e.g. workpiece slippage or order-of-operations) led to the end result of the effective Y offsets.
Remember, though, that the at various times I observed both X and Y offsets. The X offsets observed on Nov. 12 (see older post in this thread) were potentially more problematic because they actually caused the laser to cut outside the boundaries of the workpiece. I’m 99% certain that the artwork was correct on those. I truly have no idea how to explain those X offsets.
Hi, @HelenH: Sounds like you may be interested in checking out the rotary-equipped laser? Cool! I certainly don’t mean to monopolize it. As you can see by this thread, we’ve got some mysteries going on with it, but if you are interested in taking a look at it, I’m personally all for it. This machine has great potential.
@EricP, is there any official process for giving folks access to troubleshoot and/or work on the manual + class development?
No official process , the main thing is whoever wants to use it has to help develop the manual/troubleshoot the issues like you stated.
Any one that wants to contribute can.
Eric
1 Like
OK, cool, thanks Eric. One logistical question, though: since the machine isn’t on Skedda, there’s no dedicated slot to book time on it. I’ve been using the shop steward maintenance scheduling slot – is that still the standard procedure? If others want to contribute, do they need to be added to the access list for that slot?
@HelenH, @lkroloff: If you are interested in trying out the machine, please do! The draft manual is available on Google Drive here, and it should contain all the essential info needed to get started. Assuming you have already used either of our other ULS lasers, many concepts in the software and controls should be familiar. If you aren’t familiar with various laser-safe materials yet, just stick with basic glass jars or bottles for testing. The etching effect on glass is quite lovely.
If it makes sense to add a slot for it in Skedda I can. I can try to put some indication on there that about it’s state and refer to this thread.
Thanks so much guys! I’ll definitely take a look at it in the next week or two and keep you guys updated on what happens.
2 Likes
Hey all! I got the chance to spend a couple of hours with the rotary laser tonight! The manual was super helpful and I was able to get it to etch some glass with really beautiful results.
That being said, I was consistently having issues with x-axis offsets. I followed the procedure in the manual and used the red dot to identify where my art was supposed to go, but it ended up being consistently off by a few inches. The magnitude and direction of the offset seemed to vary randomly from job to job. Has anybody had any luck resolving this?
Another thought - while I was troubleshooting this I was combing through the manual for some AI calibration hints and on page 18 there is a screenshot of the process of sizing the artboard. It explains what you are supposed to do with length and width, which all makes sense, but in the image you can see that there is an offset of 16in for x and 2.5 in for y. Is there some significance to this? This was pretty confusing to me and probably should be explained further and/or taken out.
The art board in the print dialogue gets weird you have to print once then print again and switch user defined and default and the orientation a few times until you get your media size and document size to match on the bottom left corner of the print dialogue.
Eric

These should match and your artwork should show up properly (maybe rotated 90 ) in the preview.
Eric
Hey man, thanks for the advice! Sorry if I’m being obtuse, but do you mean get the media and document dimensions to match each other? If so, I cannot get either of them to change at all by messing with artboards orientations etc. Could you be a little more specific about how to make this happen?
Yes they need to match, I just got it from trial and error, screenshot what your trying next time and I’ll see if I can help more.
Eric
I think you are referring to this:
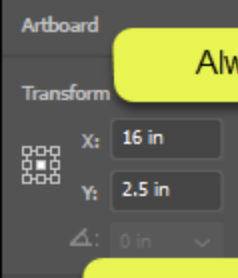
I’m no Illustrator expert, but I believe that is just Adobe’s UI for positioning the artboard itself… Like, within AI’s global coordinate system? Not exactly sure of the precise nature of it. But note that the little 9-grid control to the left is telling you that those coordinates correspond to the center point of the artboard. If you click the other gridpoints it should change the numbers to corresponding coordinates of the corners/edges of the artboard.
I’ve been assuming that these coordinates are irrelevant to the laser workflow since it it prints the whole artboard as a page. As in, my operating assumption has been that what matters is your artwork’s location relatively within the artboard.
Given that I also struggled with “random” offsets, I guess it is possible that artboard coordinates somehow affect it. However, my tests generally started with the same AI template and only changed the height, so I’d be surprised if this were the significant factor.
Regardless, thanks for continuing to test and troubleshoot. I’d love for us to figure out how to reliably get perfectly positioned cuts out of this machine.
All, thanks so much for the help. I figured out a flow that stopped the random x offsets! My secret sauce is picking the lowest center square in the “placement” option of the print dialog when printing. It seems pretty robust, although I cannot for the life of me explain it. I hope this is helpful, and lmk if you guys have any extra insight!
Cool,
Please comment that and add screenshots to the manual so it can be improved.
You should have comment access now.
Eric
Cool! Sure, I’ll add a comment as soon as I get a chance to take some screenshots.
Thank you… don’t think I’m going to be getting back in there until April or May but I very much look forward to checking that out!
1 Like
@EricP I tried to add a comment/screenshot on the manual but I don’t believe I have comment access. I went ahead and sent an edit request but obviously comment is fine