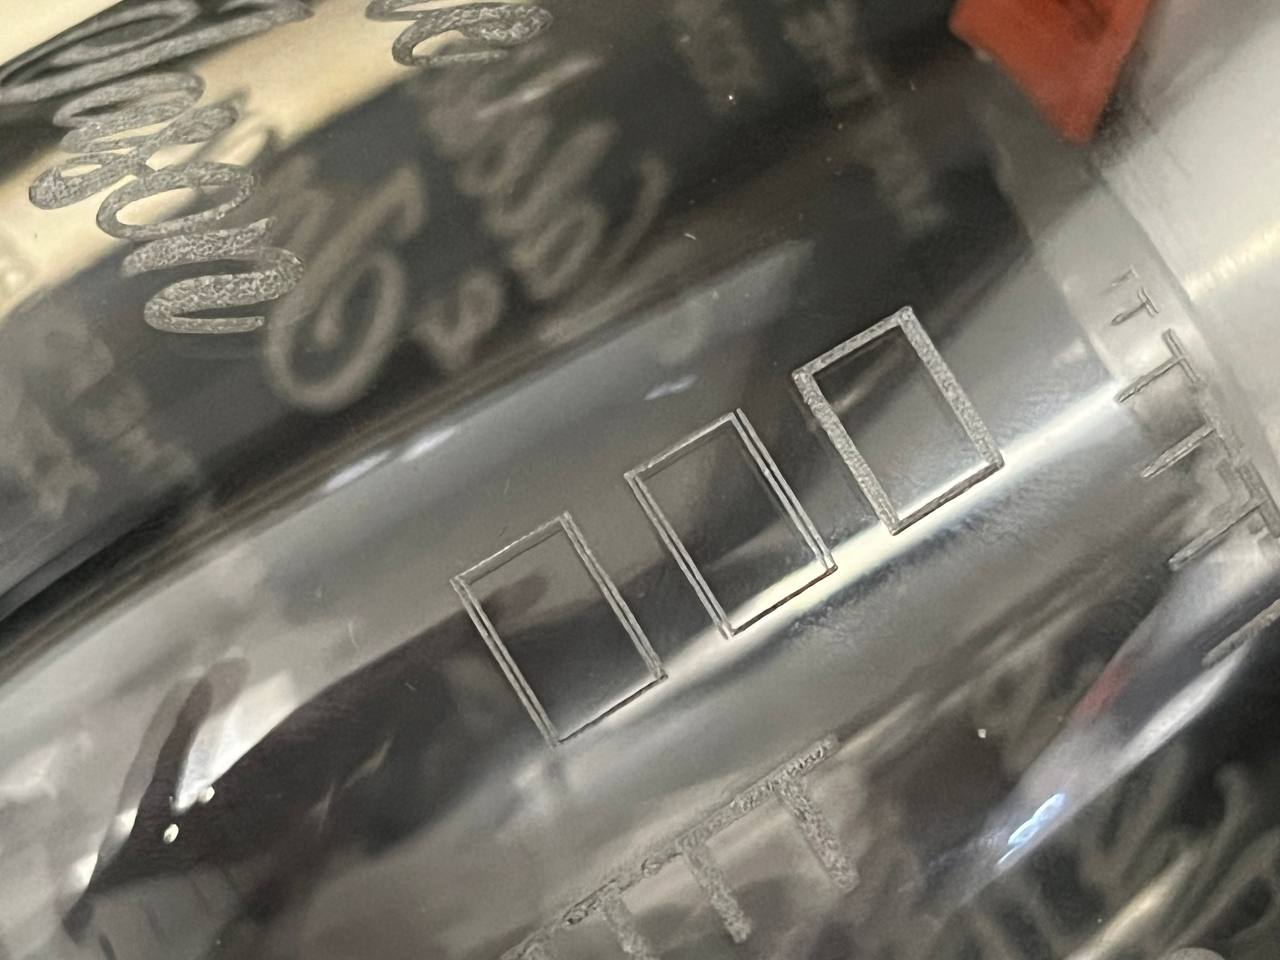
Today, @valerie and @Jordanva2 and I were doing some rotary etching on wine glasses, and noticed a strange issue. We were investigating a bit with @eriese and here’s what we found… Independent of input files, independent of the settings we tried, independent of location on the workpiece, and independent of the rastering direction, it appears the laser is producing a crisp duplicate of the expected image a few 100ths of an inch over, in the direction of the fast-travel axis. These were simple black-and-white images, no shading. I found this is most noticeable by printing a rectangle with 0.25 pt line thickness. Typically with rotary, the fast axis is X and the slow axis is the rotary – in this case, the duplicate image appears with an offset in the X direction. We confirmed the problem wasn’t with our data files by rotating them and printing again, and we found the duplication was still in the laser’s X direction, and didn’t rotate with the input image. We also confirmed that printing our image at a few different scales had no effect on the size of the offset. I also tried changing the raster orientation, making rotary the fast axis and rotation the slow axis. This had the unsurprising but still amusing effect of major slippage along the rotary axis turning the rectange into a “swoosh”. But, the corner of the swoosh was sufficient to confirm my suspicion that the duplicate image offset would still appear and would still be along the fast axis, now the rotary axis. Enoch went through a bunch of other settings like power, speed, DPI, etc. and we couldn’t immediately spot any effects from these changes. I left the wine glass we were using to experiment on in the cabinet in the laser room, with the clearest evidence circled with a sharpie.
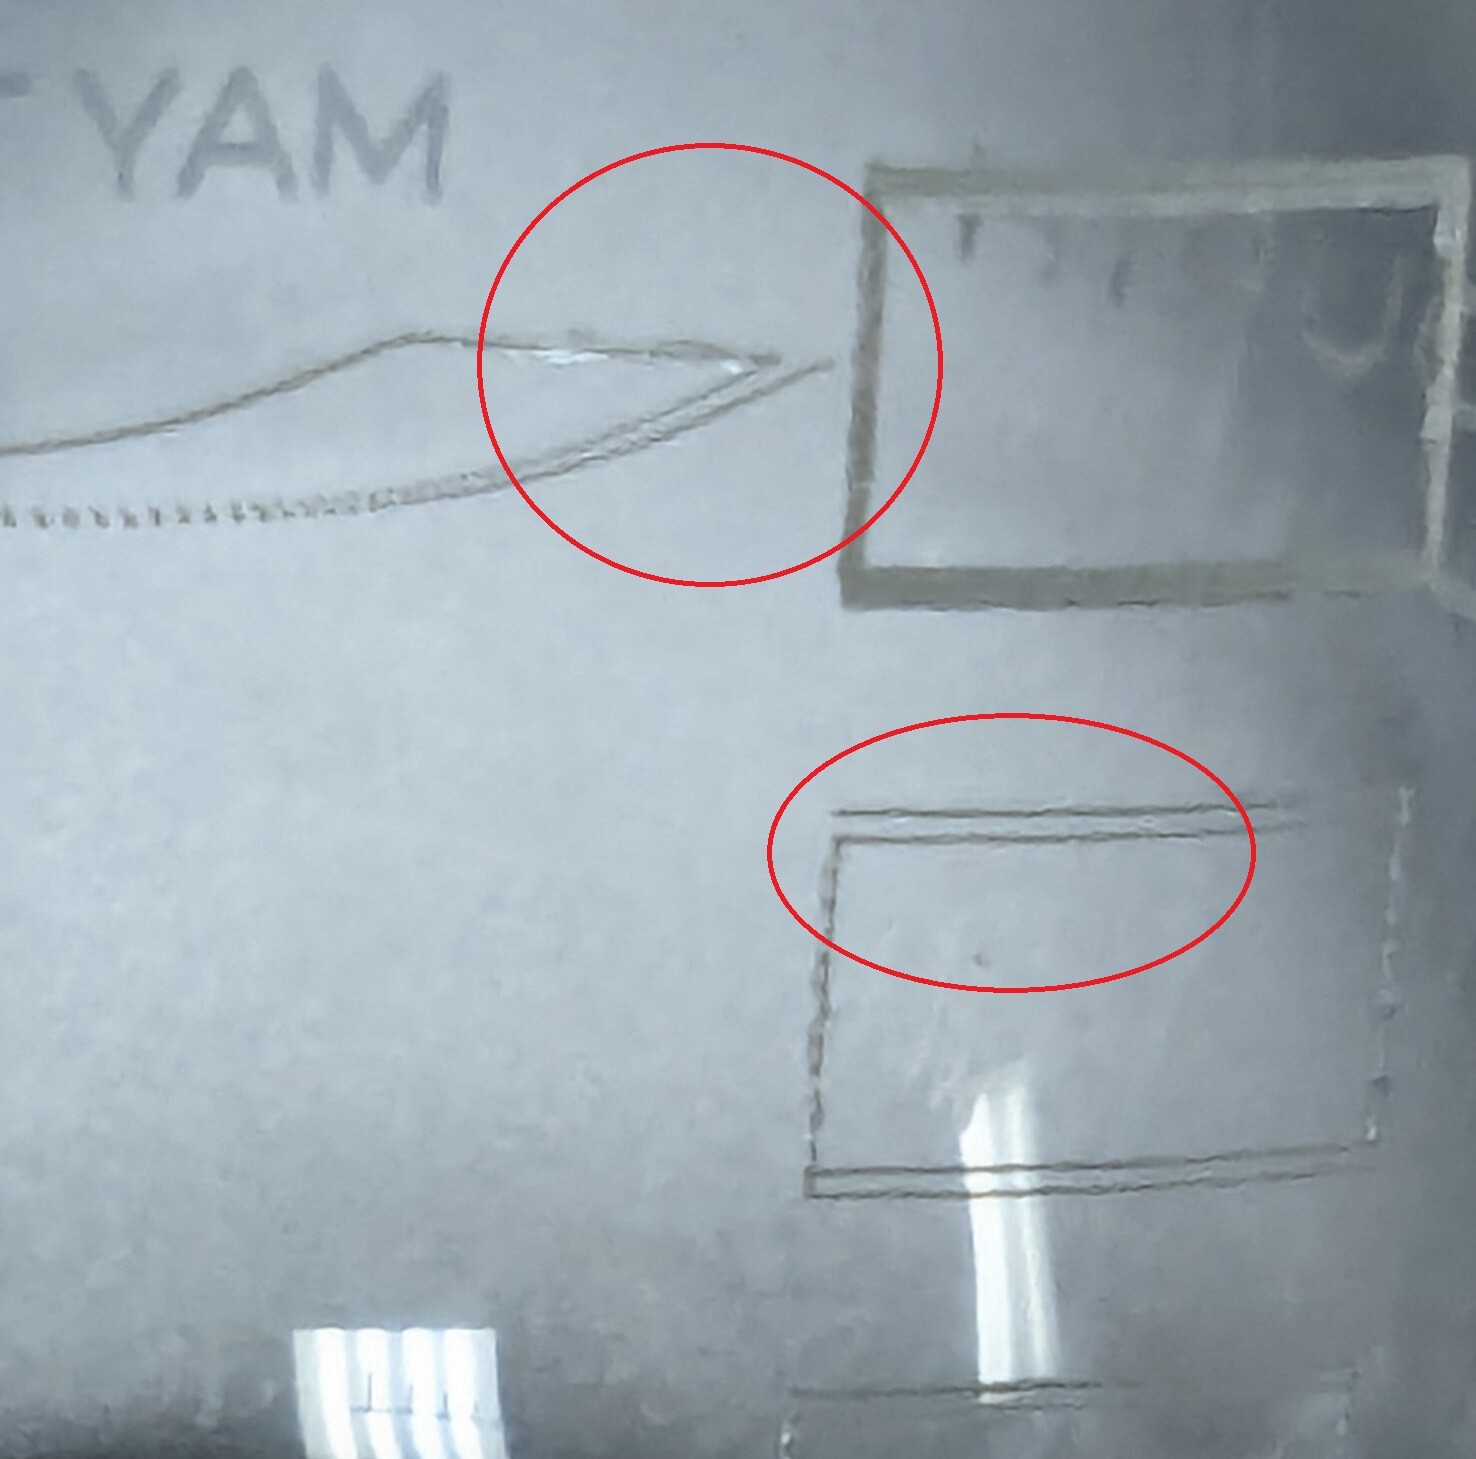
Here’s the best picture I could take of it on my phone. In this photo, left-to-right is the rotational direction, and up-down is the laser’s gantry X axis. The lower circle shows a small rectangle cut using X as the fast axis, and you can see the lines are doubled with a vertical offset in the picture, i.e. along the laser’s X axis. The upper circle shows the hilariously slippy attempt at making a rectangle with rotation being the fast axis, and what should be a vertical line along the right edge is clearly doubled horizontally, i.e. along the laser’s rotary axis. Given all the evidence, it seems like something is causing the laser to have a delayed secondary pulse of equal intensity at a fixed distance delay after the first pulse. @dannym or anyone else – do you have any guesses as to what is going on here, and how we can fix it? Thanks!
We didn’t get a chance to test without the rotary. We’re very interested to hear what the issue turns out to be. I couldn’t see any evidence of a lens issue with the mirror we have for checking.
@dannym, an important detail I’m not sure you caught in this is that the duplication always occurred in the X direction. The test with the slippage showing the duplication to the right in the top circle is from telling the laser to treat the rotation as X (i.e. X and Y flipped from their norm). The test circled with the oval below that shows normal rotary operation with the duplication occurring above. Given how consistently and precisely this duplication replicates and that the direction of the duplication changes when X is changed, it seems unlikely this is a loose screw or cracked lens.
I did check it out that night but didn’t have rotary stock or the time to do a functional test.
I didn’t find a mechanical prob. The carriage head screws being loose DOES commonly cause this, it shifts to one side then the other when it changes directions. Double image was reported a number of times in the past and this was always the cause. They were not loose when I looked, bur still, the strongest theory is that they were loose and someone tightened them before I got there.
They don’t loosen up by themselves, I believe this would be from forgetting to tighten at all when replacing the lens holder assembly after cleaning or removing to better check the lens, rather than needing to be tightened more.
I do want to be very cautious here- that is thin aluminum and stripping the screws by overzealous tightening would be a very expensive repair.
The system doesn’t really have any capability for the laser to fire “late”. This looks like a backlash error between the left and right rastering directions.which can have several causes.
If the pulley was loose, it could cause backlash that looks like this, but I didn’t see any prob like that
If, somehow, backlash compensation was enabled in the driver (under “image tuning”) and given the wrong value, it will cause backlash error that looks like this. But at the time I saw it, the backlash comp was disabled as normal and the comp parameter was also set at 0.
If the problem is occurring, we could try disabling bidirectional rastering. Takes 2x longer because it won’t raster while returning to the other side, but it would stop the double image and narrow down the prob
Thanks @dannym, we’d definitely love to look at this with you more and troubleshoot further. The glass in the picture here is in the top right of the laser cabinet, so that’s readily available when there’s time to test. We might be able to come up there this weekend, so maybe we can find time to sync up with you when you’re able to test further.
Is disabling bidirectional lasering something available in the standard ULS settings or something you have to do at a deeper level in the laser? Very curious what results we’d see with that test.
It’s in the driver. It’s a quick and dirty way to remove backlash without calibration. Backlash will create a small lag in the actual position, so the left to right lines will be shifted a small amount to the left and the right to left lines will be shifted a bit to the right. Rastering in only one direction means there’s no difference with the prior line because it’s always shifted in the same direction. But takes twice as long
Pearl has very low backlash by design, though. I don’t think anyone has had a quality issue without it set
Backlash compensation isn’t all that straightforward. There can be some variation in the ideal compensation number from the left side of the bed to the right, since the length of belt being pulled from motor to carriage is different.
Pearl has very low backlash by design, though. I don’t think anyone has had a quality issue without it set
Backlash can also come from the delay from the fire command to the actual laser output. This issue is there in HVDC-excited tubes when rastering at high speeds. Dorian is HVDC-excited. But Pearl, Blue, and Tarkin are RF-excited and have no measurable lag in this regard
Just checked with Jordan and David and they were able to do both a vector and a raster image using the rotary without any lines being doubled. We’ll keep an eye on Pearl but for now all looks good.
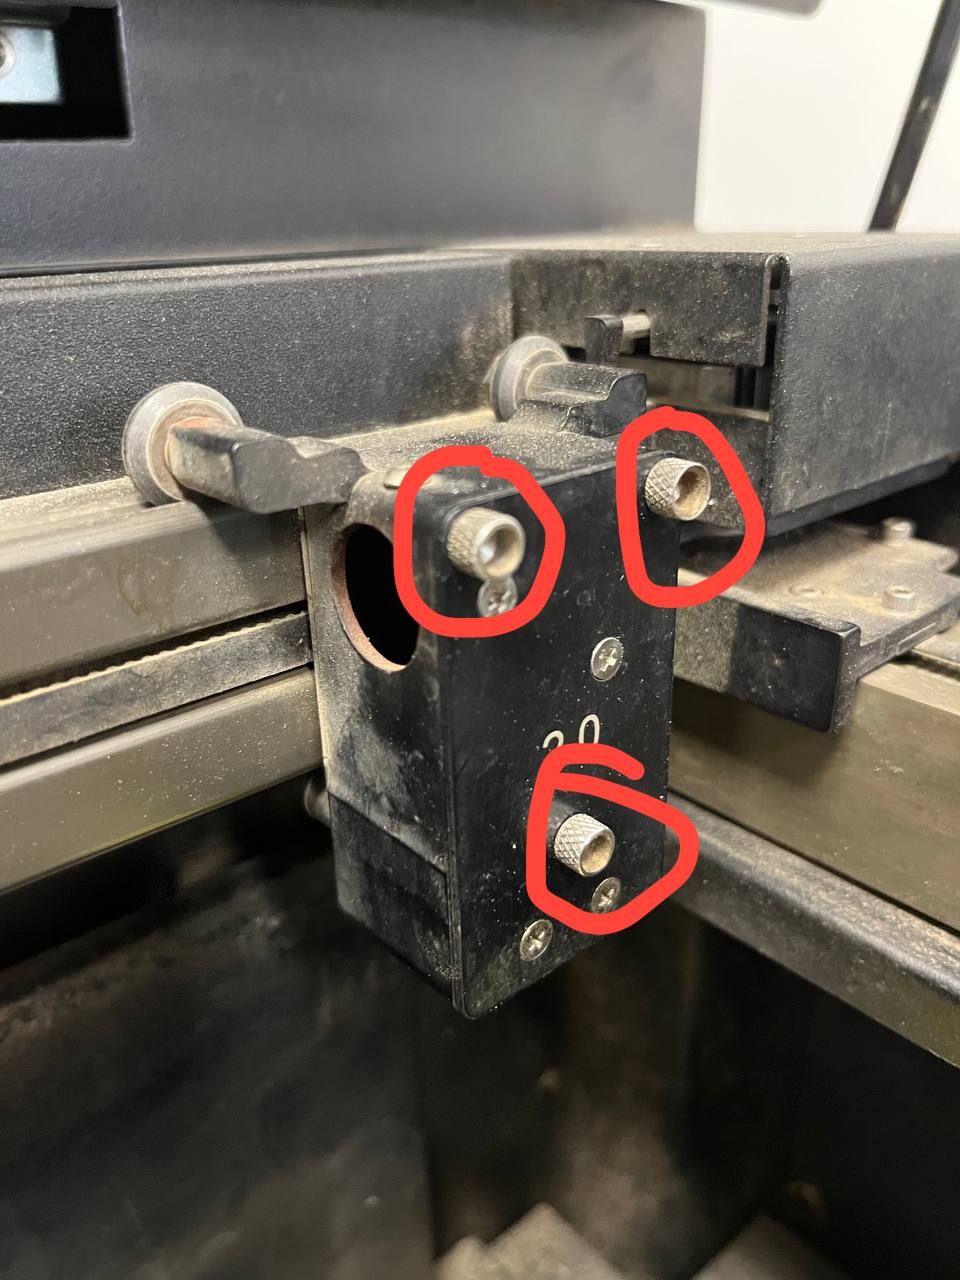
Yeah I didn’t want to be dismissive, but this was pretty clearly just that the lens holder finger screws were loose. That causes double images. It would be really farfetched to have any other cause of it. A cracked lens doesn’t create such a distinct doubling and will create major cutting issues in general.
Those screws look like hex cap screws, but they’re not. The hollow cup interior is smooth, there’s no hex. The exterior is knurled for finger-tightening and should not be tightened with anything but basic finger pressure. As far as I can tell, these don’t seem to loosen themselves, rather, they probably didn’t get tightened when the lens holder was put back in after cleaning.
If you try to gorilla it, it could cause some really troublesome damage, thus the reason those aren’t hex cap. Those are unique custom-machined screws made by ULS. No wrench or tool should be used to tighten them. A few times over the years I’ve found them tightened down so hard that I had to find a wrench to loosen them. Infrequent, but alarming to see.
Why would the double-image change direction when flipping the axes? Is it an all-axes wiggle that’s just more pronounced in the direction the carriage is moving more quickly?
Hey everyone, thanks for the replies! Sorry to be so slow getting back to this thread. I’m back on Pearl and I am still seeing this problem. Valerie and I both checked that these three screws are tight, and we still see rastered rectangles with 0.25" thickness being doubled in the fast direction (i.e. left-right in this image). I’m going to try disabling bidirectional rastering to see if that at least works around the problem.
OK, I found a solution here… Confirmed again that changing the speed and power had no effect on the spacing between the doubled images. I googled around for ULS documentation, and found this:
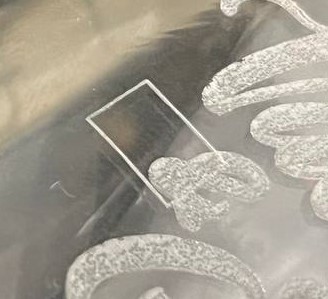
So I played around with Tuning and found experimentally that +13 produces much better results:
Not a great photo, but now the horizontal lines and vertical lines look the same to me. I will be sure to set the Tuning back to zero when I leave, but for anyone who sees doubling in the fast raster direction, try messing with the Tuning value on the Advanced page of the settings (and of course please set it back to zero when you’re done).
Danny, I was looking for the driver setting you mentioned to disabled bidirectional raster strokes, and I couldn’t find anything. I did find the node in the registry for the RSX-1832 by searching for an instance GUID I found in the Device Manager properties – it’s here:
Unfortunately nothing in there looked like it would control raster strokes. I did see a “Duplex” option but it was already off. There are a few bitfields with names like Attributes, but I couldn’t find any docs explaining these. For future reference, how did you do this?
Alright, I’m off to raster 175 wine glasses… thanks everybody!