First step Proof-of-Concept for a new battery

Hi everyone,
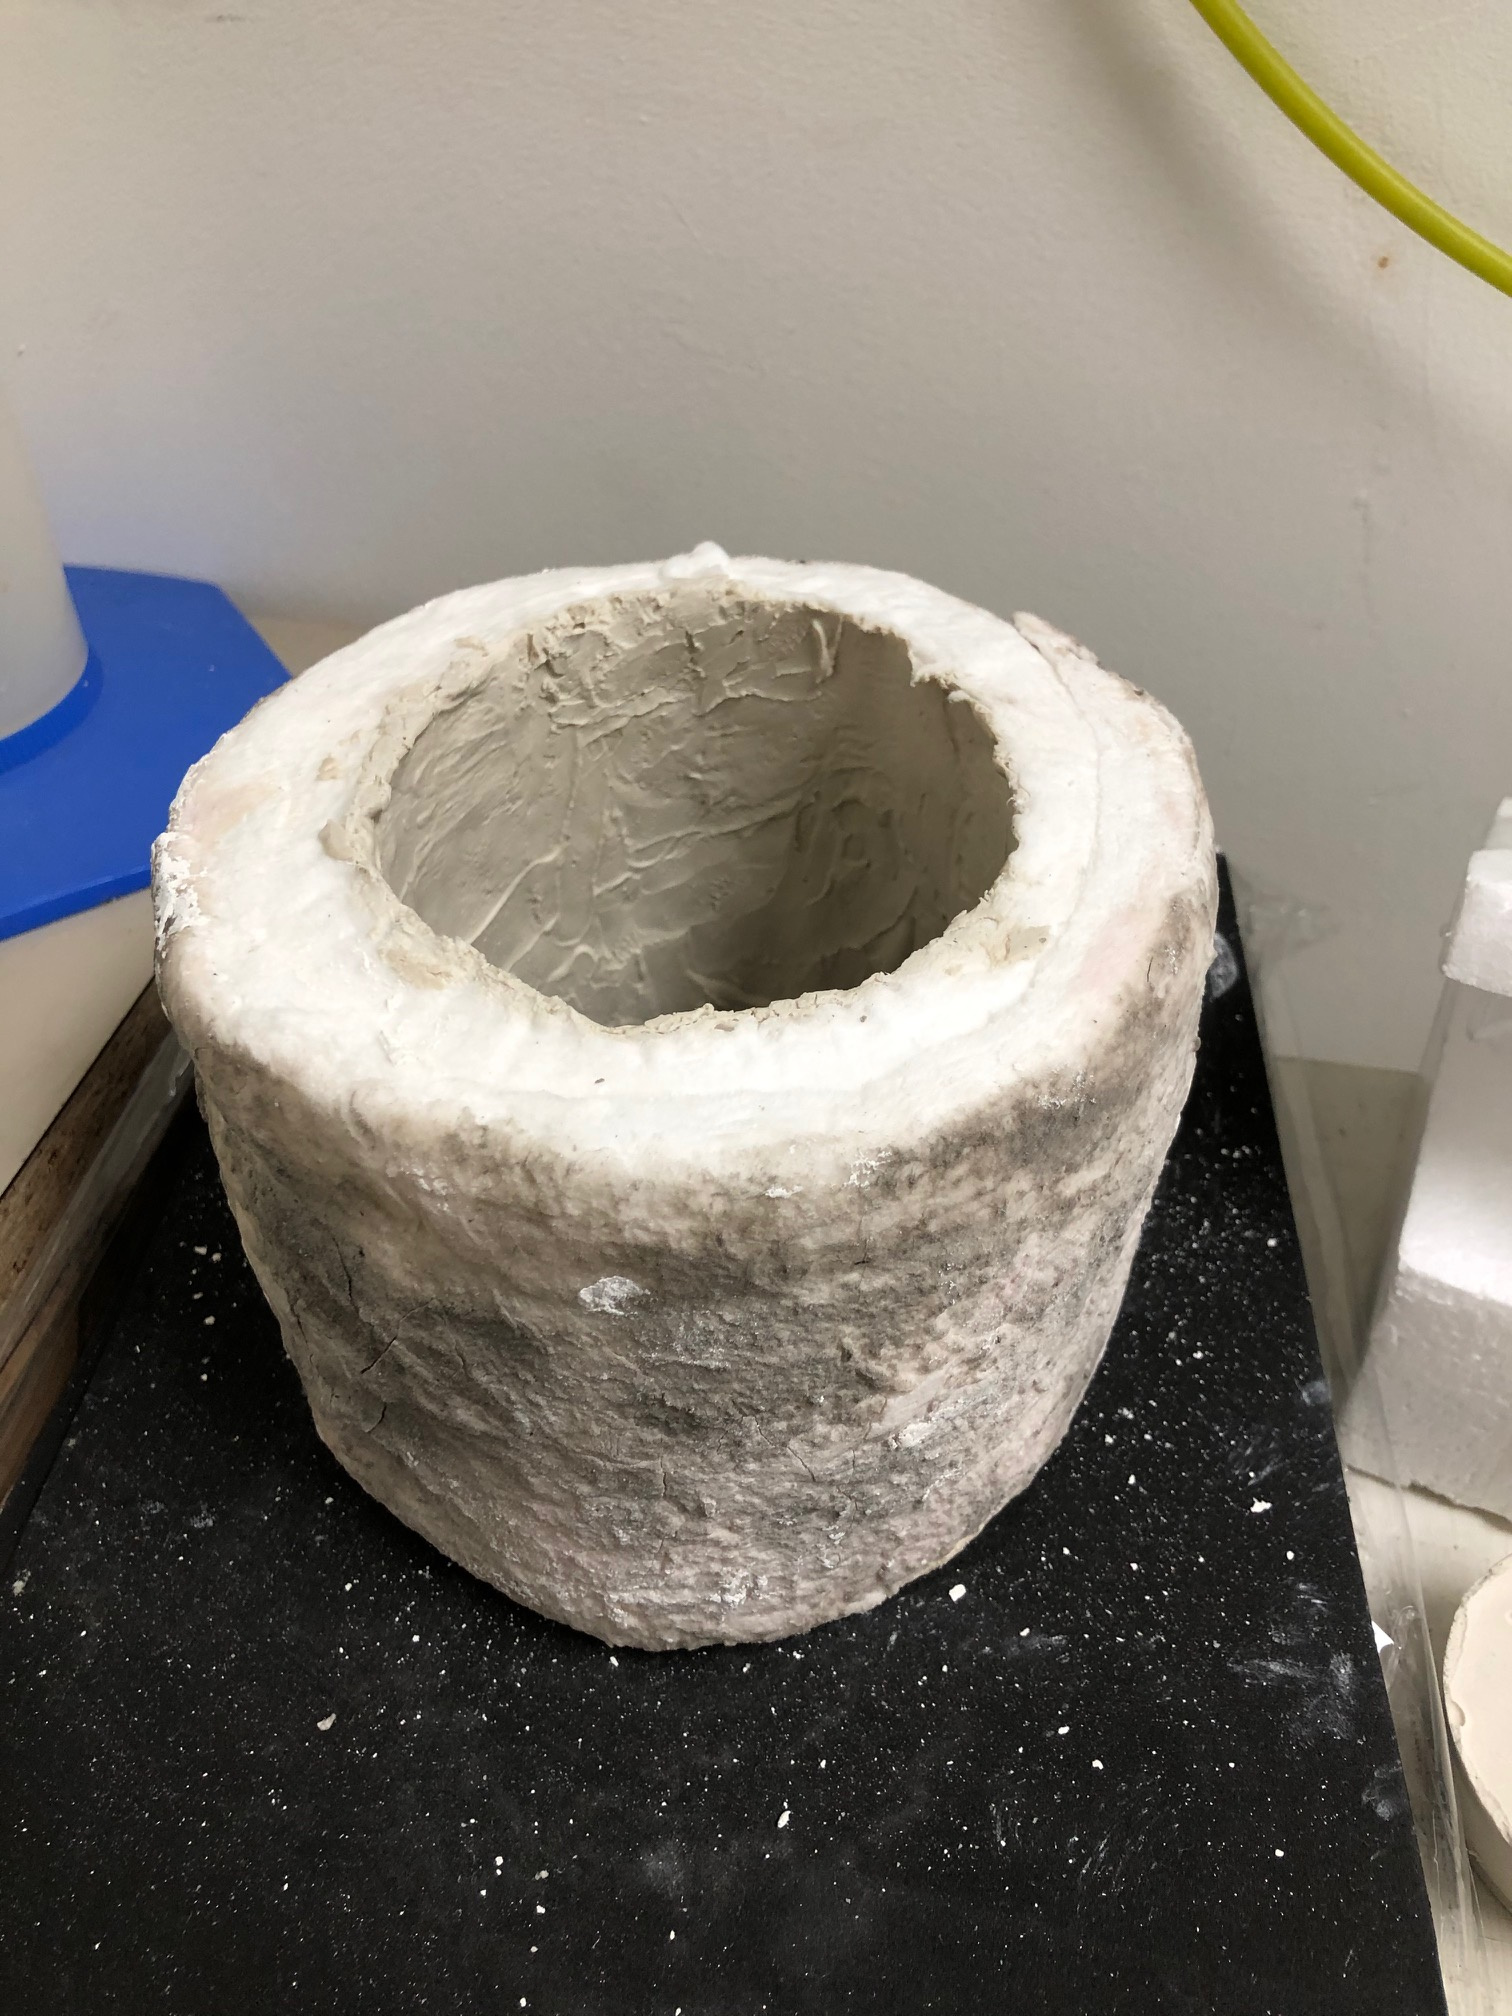
I have an idea for a new/better battery to make renewable energy practical/affordable and I’m in the proof-of-concept phase now. Some older hard tech entrepreneurs I talked to independently said it would take 1million+2yrs to do the proof-of-concept work which I definitely don't have (I'm living off my grad student savings atm). So I figured if I could do the first step of the first step of the proof-of-concept, I could use that to prove to grant/fellowship/competition reviewers that I'm legit and give me a shot+grant . Work-wise, I’m trying to make a ceramic-polymer composite membrane and the first step I’m trying to do is to make the ceramic material which involves mixing some of the above powders together and heating them. Nothing dangerous.

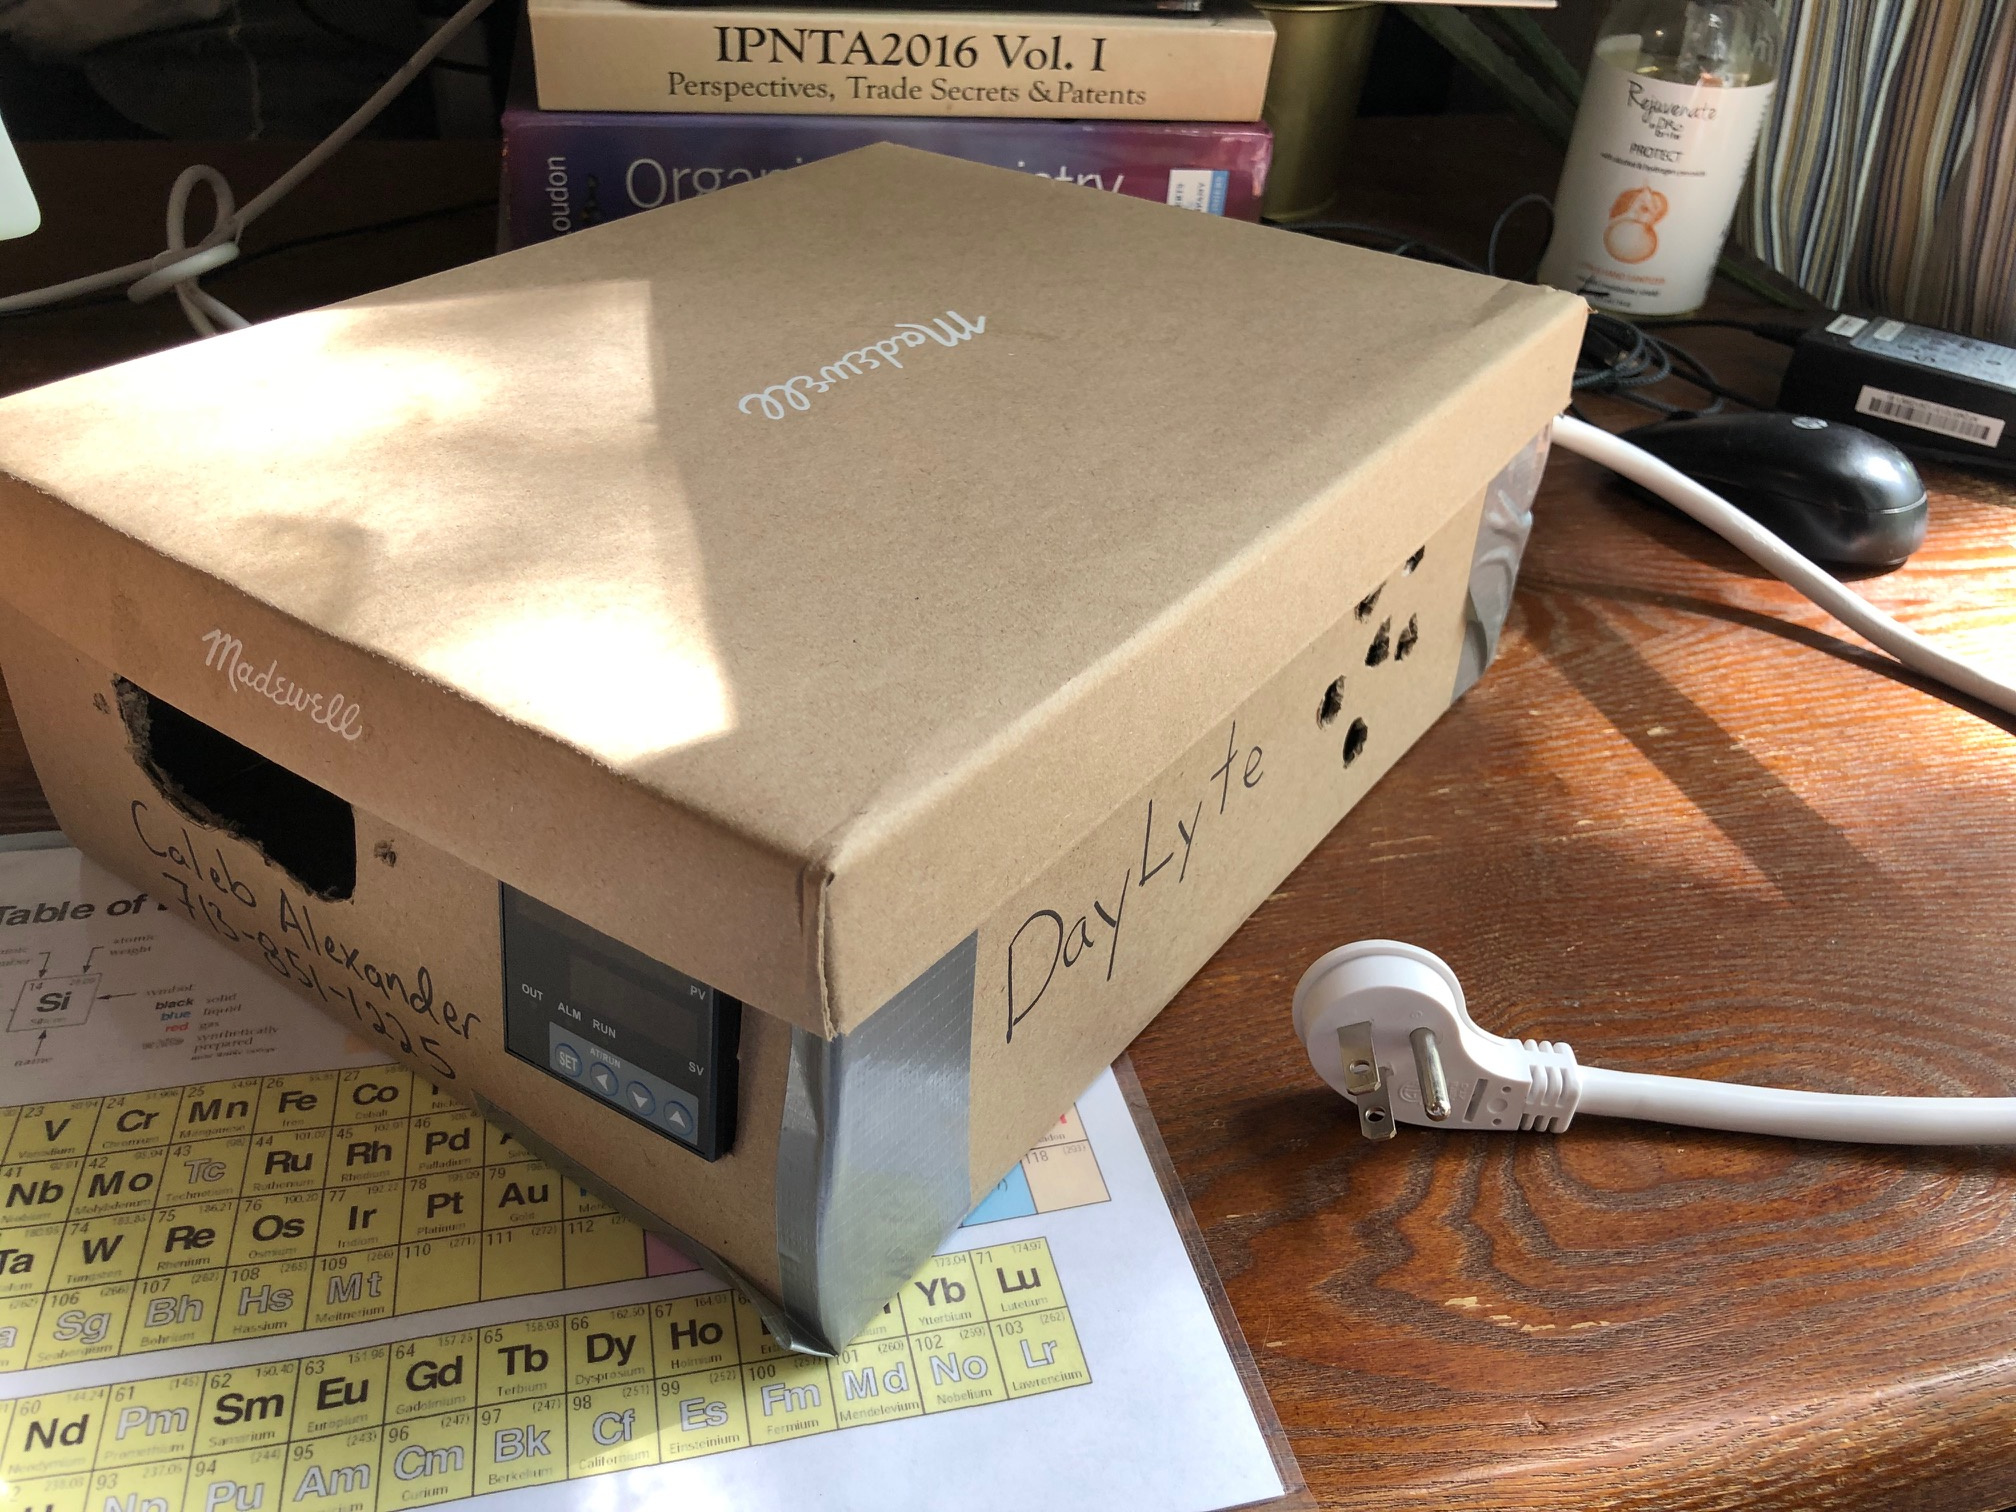
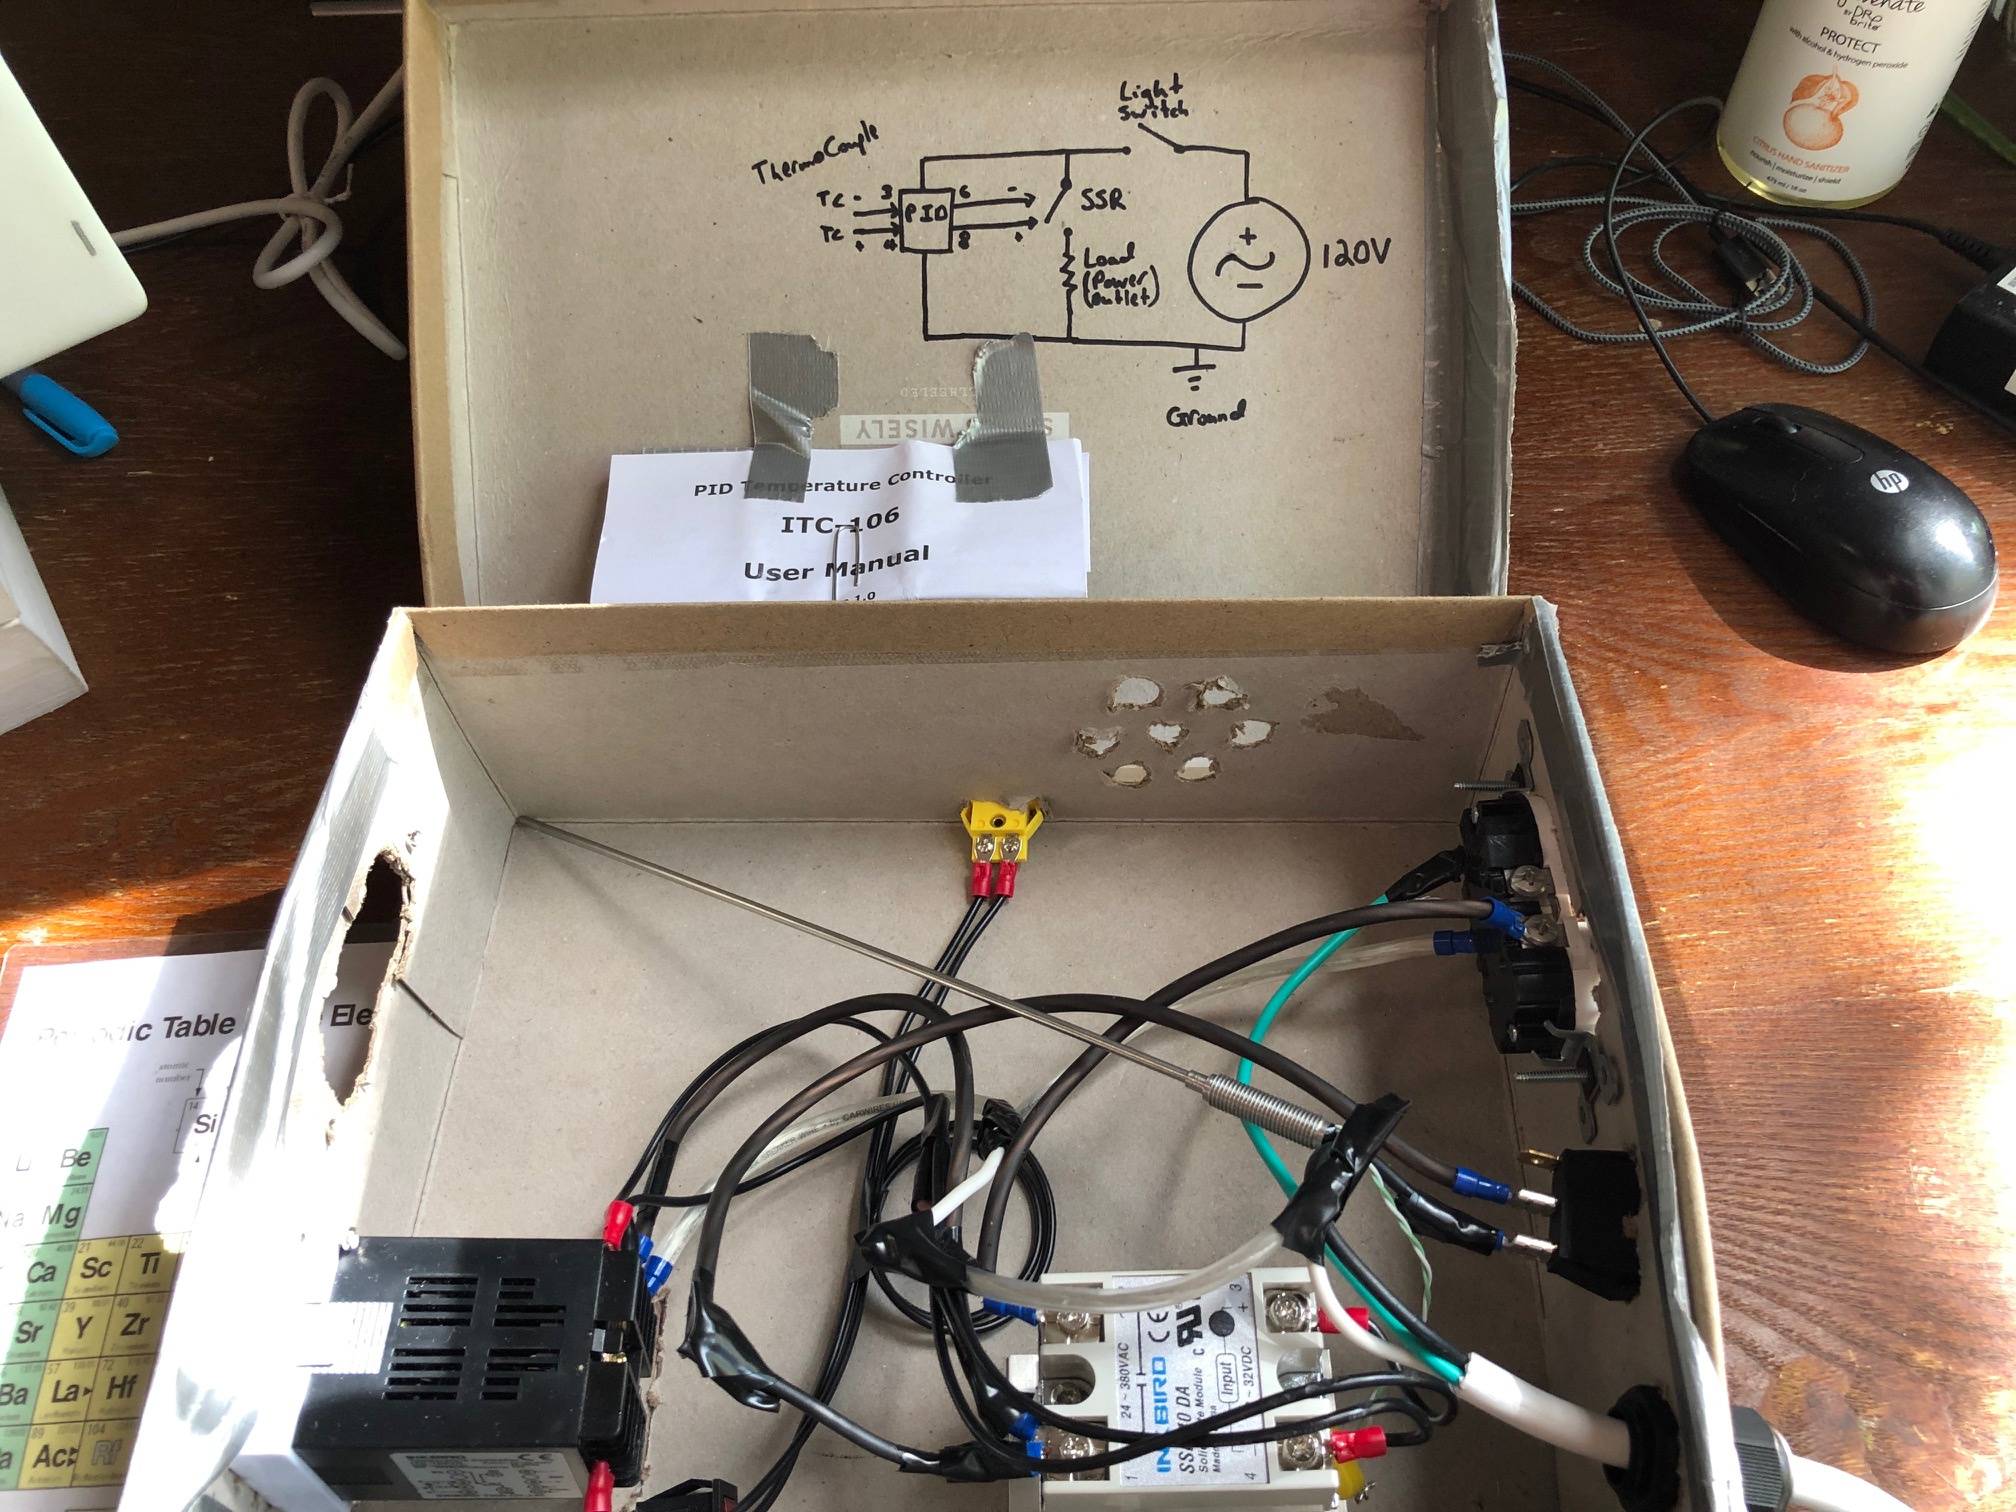
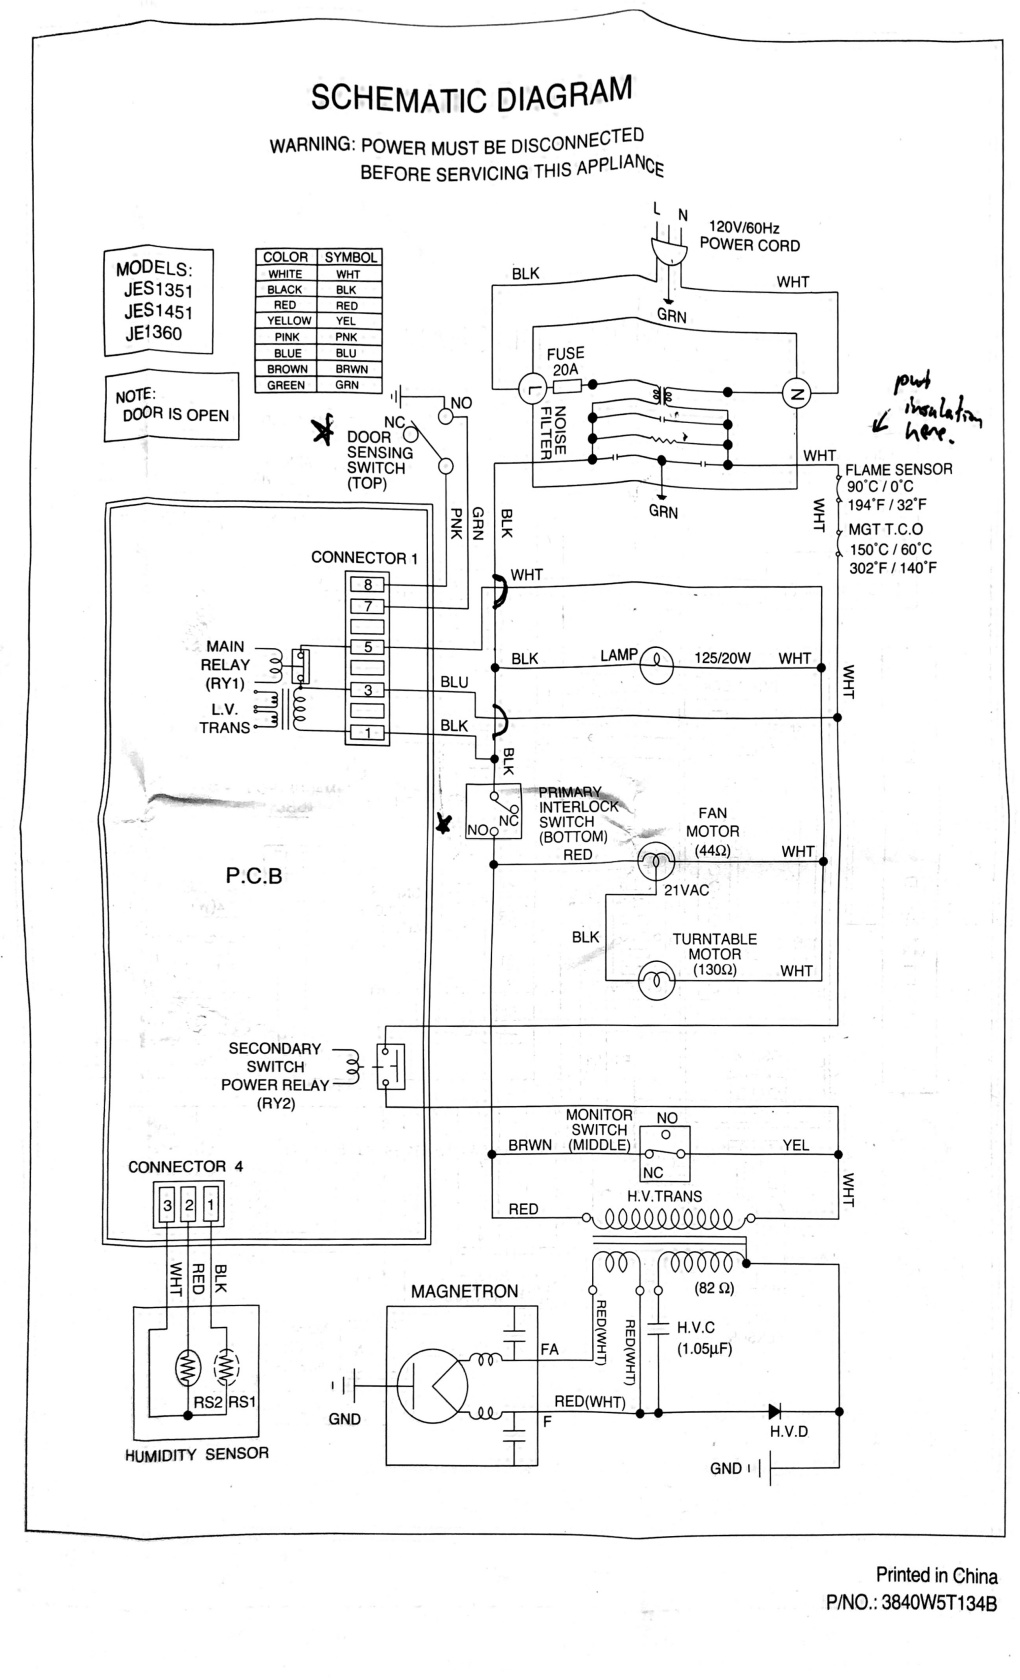
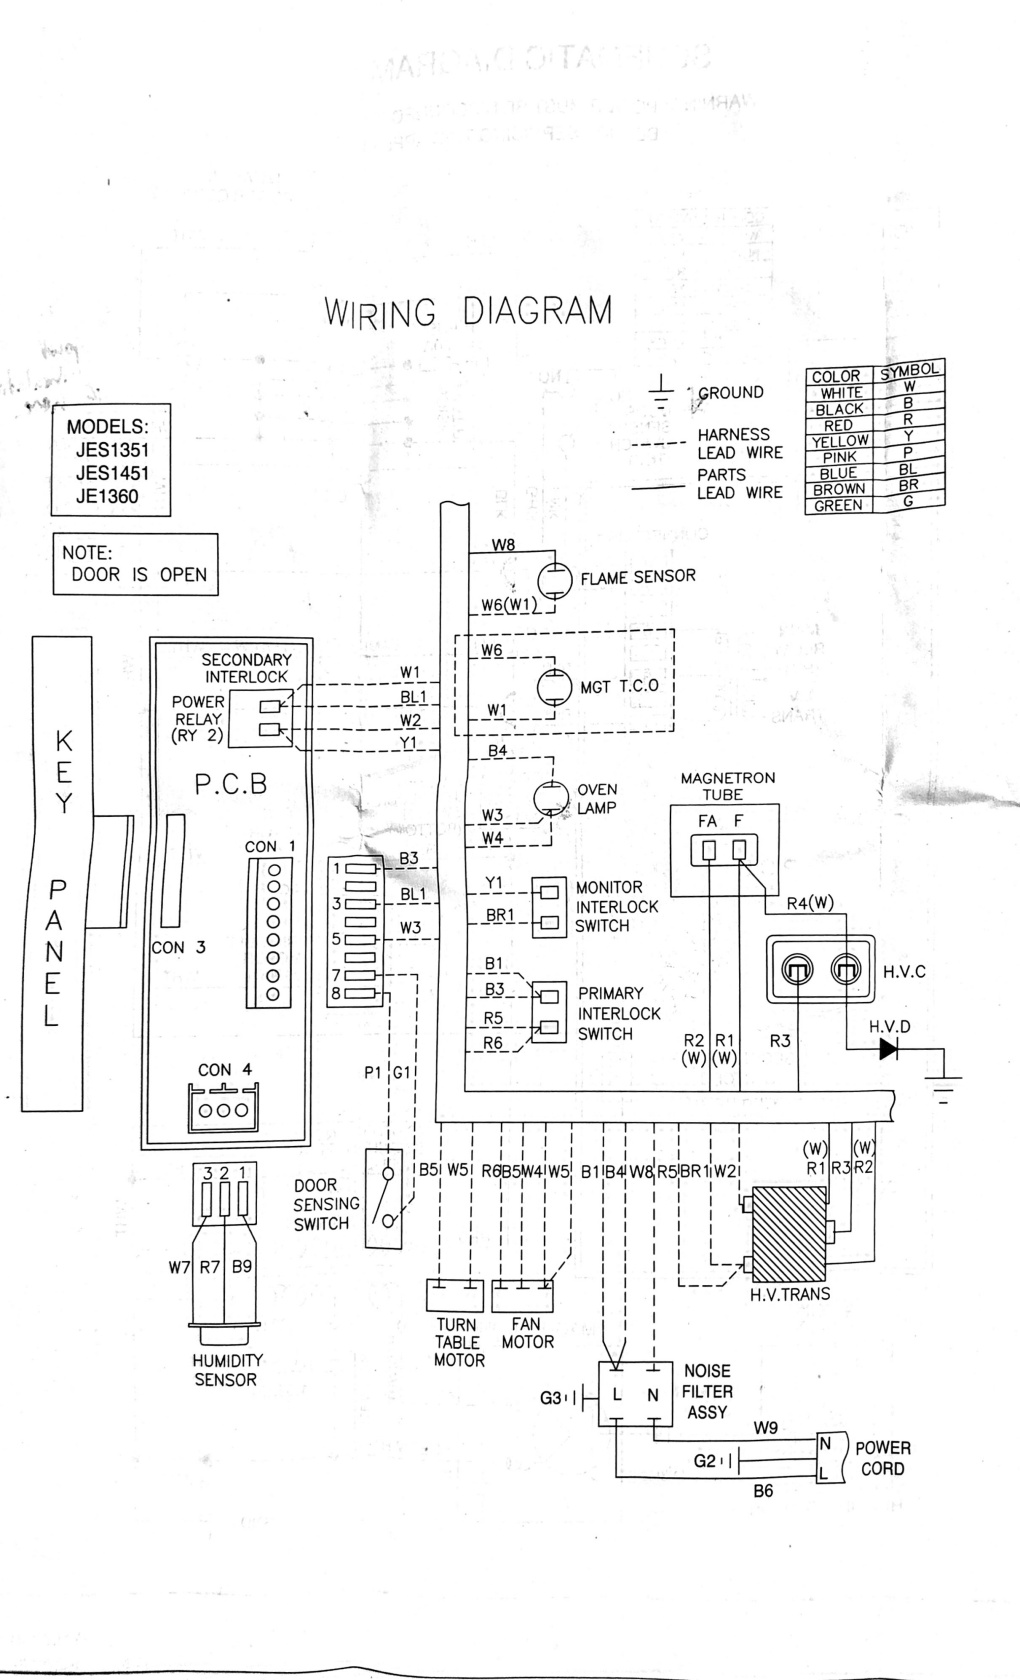
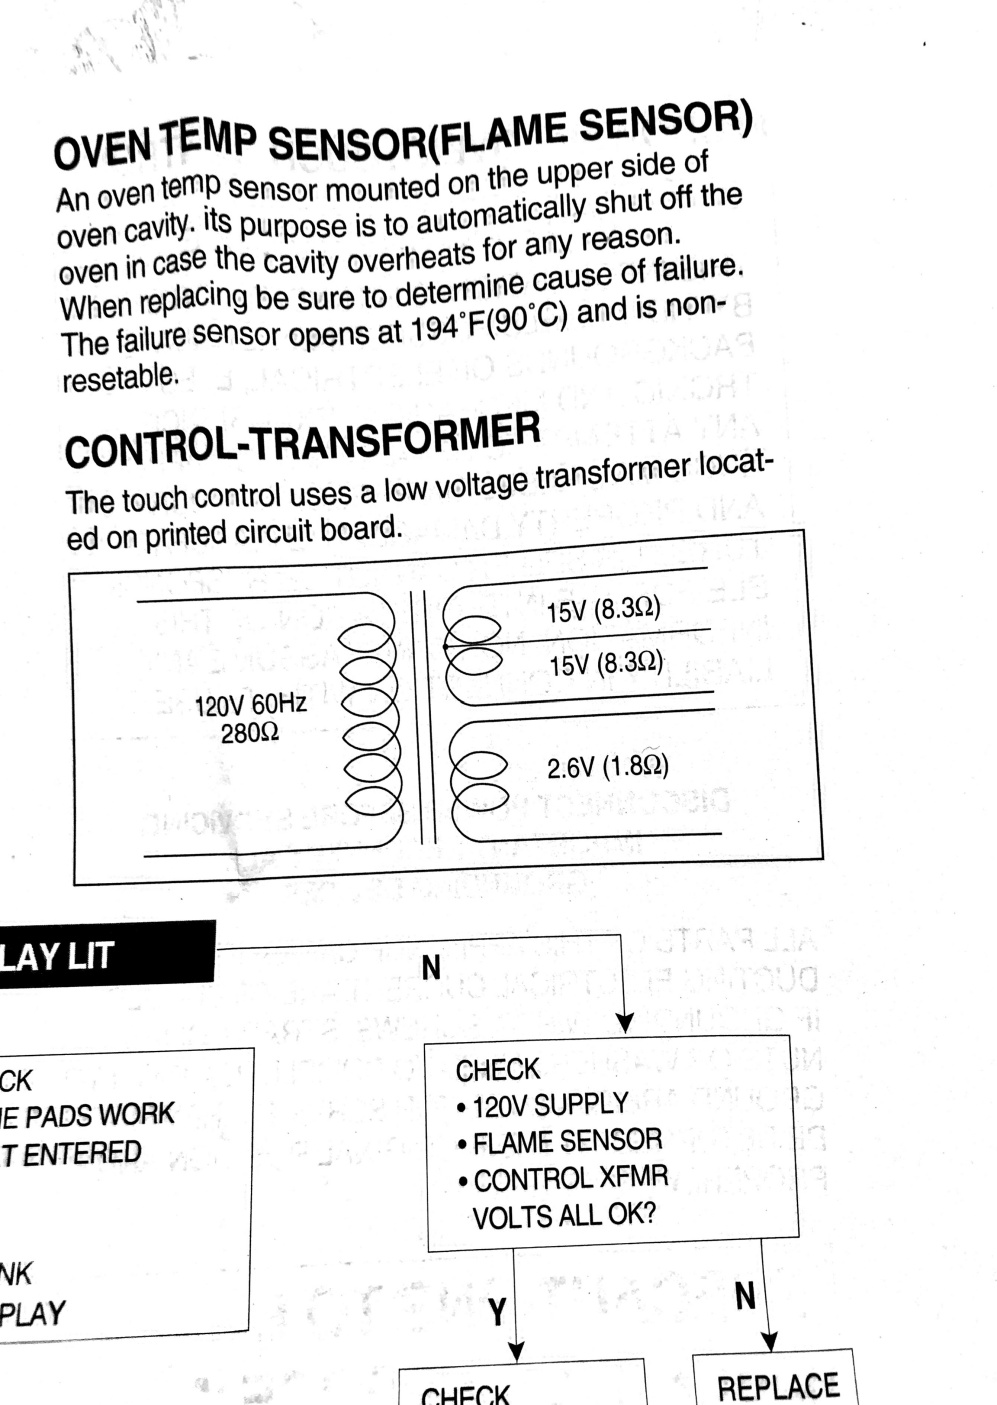
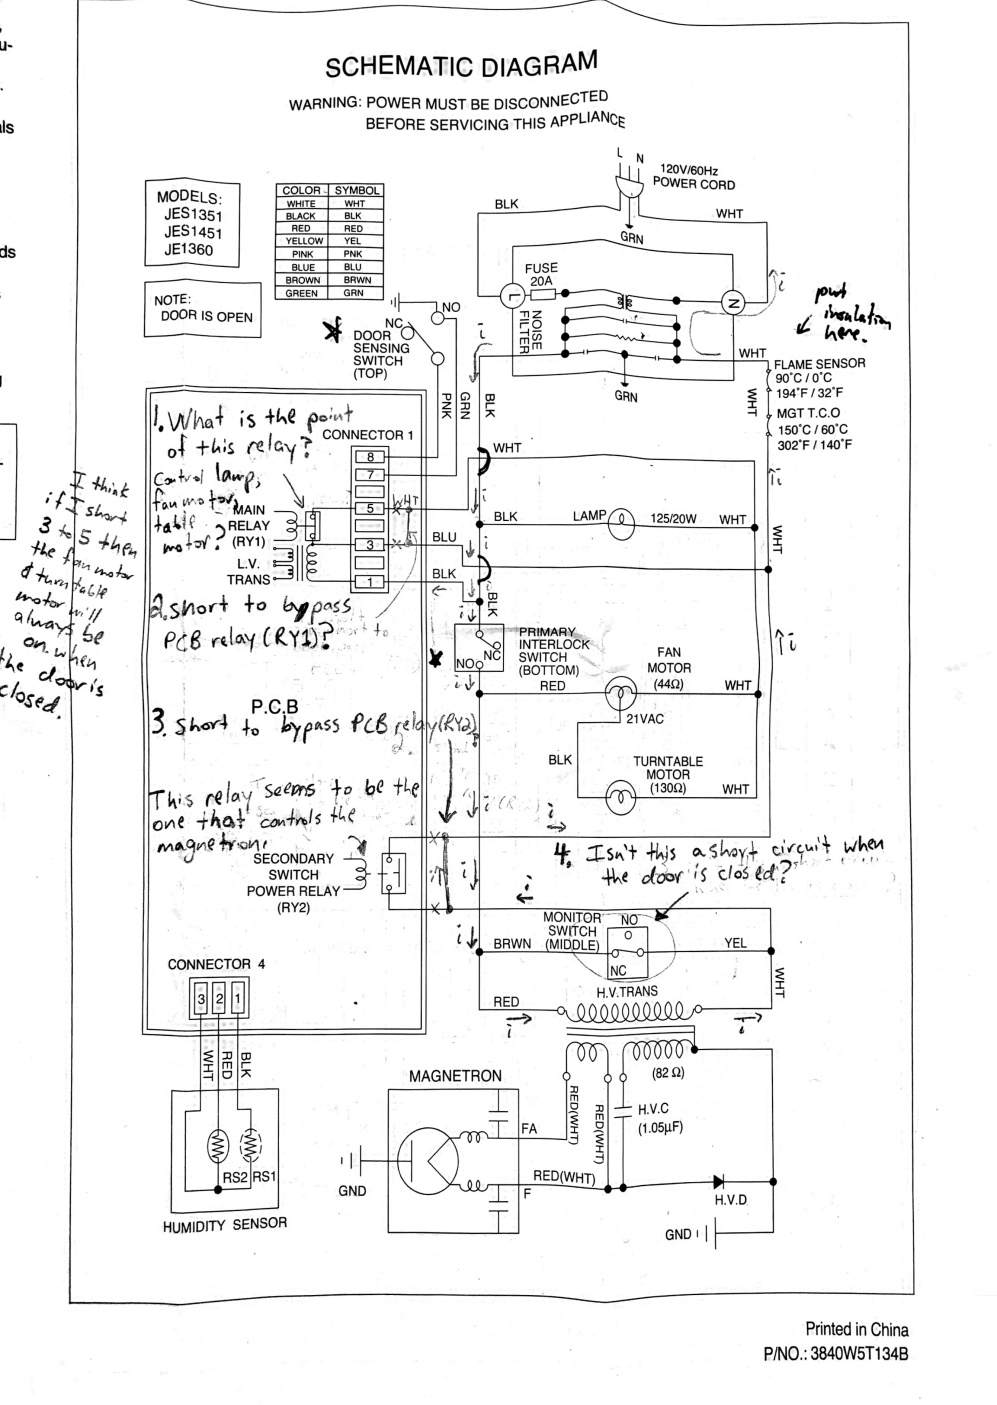
To heat them, I was planning on converting a toaster oven into a small furnace with temperature control and data logger. I should be picking up most of the parts today and the rest maybe next week. Although I’ve done some research on how to do this, I haven’t modified appliances before so I’d appreciate any metal work/electronics help/advice folks have to offer. I’ll then make some samples in the biolab and bring some tools like a mass balance, sonicator, hot plate, etc. The powders I’m working with are benign like SiO2, ZrO2, sodium phosphate, baking soda, water, etc. but some of them are about micron sized so I’ll be working with them in the fume hood with a face mask to avoid accidentally breathing any in. Due to the 12hr/week work schedule, I figure that the project of converting the microwave and making the samples would take 1-3months. If you’re interested in working with me or have more questions, feel free to hit me up :slight_smile:

Best,
Caleb

1 Like

Thanks, Caleb. I wanted to tag a couple of folks who know electronics @Bion @ghamp @ttrout @bridgesderek and are current members or connections to the space – we also should connect you with @machiavelli and walter in the Biolab – I’ll send out an introductory email post-Orientation.

Ok awesome! Thanks Kye :slight_smile:

There was a converted toaster oven that was used for reflux soldering. I believe it was still in the electronics lab as of a month ago. The owner left it there and hasn’t been a member for quite some time. He wouldn’t be on DIscourse but if you would like to talk to him about his experience I can dig up his contact info.

1 Like

Thanks, I’m sending Caleb a PM so we can connect.

what temps do you need?

Do you know if it was temperature controlled? I’d be down for a chat to learn more about controlling it. The max temperature I would need to go to would be 1100C. Thanks!

The oven is going to cap out at probably 350C. For 1100C, that will require a kiln or induction furnace. Although, if you’re not too picky about temp control, there are microwave oven kilns. It’s ceramic with a graphite-lined interior, the graphite absorbs the microwaves and turns it straight into heat with no specific temperature target. Microwave kilns are commonly used to fire small pieces of glasswork.

Temperature control is important for me, but another avenue I was thinking of would be to use a microwave with a SiC crucible which will also absorb microwaves. Maybe I could try to bypass the microwave’s built in control circuit and substitute my own? I found some diy PID control videos on YouTube which seem feasible

you can, in fact unless you have an “inverter microwave”, the microwave oven’s control board literally doesn’t do anything on the cooking side but actuate a 120vac relay to turn on the transformer. The conversion to high voltage, rectification, and magnetron oscillations are all automatic and have no further controls and the control board just gives it 120vac or nothing.

But, it does need to turn on the fan (usually 120vac too, and switched with the transformer power) and respect the door interlocks so it can’t turn on with the door open.

Huge DIY induction heater kits are cheap though, just drop in a graphite crucible:

Yes, the toaster oven had a controller purchased for it that was supposed to control the temperature curve. I can see if I can find his email, he is a FB friend.

I assume he left the toaster oven in the electronics lab for something like this although Danny thinks it wouldn’t be near hot enough. I have no clue on any of that…

Any toaster oven would get nowhere near 1100C. Most American appliances work in Fahrenheit. 1100C is 2012F. I’ve never gotten a toaster oven over 400F. The oven itself would burn up.

I seem to remember a small kiln or metal melting crucible at the corner of the metal shop. Maybe that?

Hi Caleb,

II have an Abrell 0224 with regular test coil and also a levitating coil, https://www.thomasnet.com/catalogs/item/380964-13982-1001-1002/ambrell-induction-heating-solutions/2-4-kilowatt-kw-easyheat-induction-heating-system/ I also have the water chiller for cooling it. It has not been used in 3 years, but has been kept in good storage.

I am sure this can give you the results you’re looking for. You would need to get a susceptor, graphite ones are reasonably priced, I can put you in contact with a good company for them.

The inductive heater needs to be cleaned up and the water tubes etc replaced.

I hear you’re responsible and capable. If interested can give to you to use for your project.

1 Like

Whoops, just saw the new posts. I guess email didn’t alert me.

@MikeK thanks for the offer! I already got a microwave and SiC crucible to do the job, but if this setup I got doesn’t work then I’ll def take you up on it! Here’s some updates on my progress so far:

Biolab is looking FABULOUS now :slight_smile:

I finished the temperature controller for it:

With the inside shown here:


The microwave will plug into the power outlets in the upper right hand corner.
The k-type thermocouple is laying in the middle there, but will be plugged into the yellow thermocouple insert at the top of the picture there. The thermocouple cable is a little short for my liking. I should be able to extend it by just adding some 18 gauge wires right?
I can’t program a temperature ramp schedule with it, but maybe in the future I can replace the PID controller in it to have a ramp schedule.

I mostly finished the insulation for the crucible. Here’s the middle section that will contain the crucible:


It’s made from a silica/alumina fibers and the OD is about 6". I used water glass to better solidify the outside. @EricP helped me with the sand blaster to abrade a sheet up glass that I then added water to to polish the top and bottom side flat. I noticed that it absorbed quite a bit of water and the polishing motion solidified/consolidated the loose fibers together to make them a solid surface which is great to avoid stray fibers from leaving. I ran out of water glass and I noticed that the inside insulation was still fibrous and would leave small fibers in the crucible. I used some plaster of paris (PoP) on the inside to make a solid wall. I need this furnace to go to 1100C and PoP should be able to take 1200C so it should be good. I then let it dry overnight. I also coated the top and bottom pieces with PoP and let them dry overnight as well:

The sharpie markers indicated where the PoP didn’t make it into the PVA foam mold I made so I needed to add some extra PoP after the first PoP stiffened enough. I made some control PoP samples and microwaved them after an hour and noticed that they emitted a bunch of boiling water, which then got sucked right back up into the PoP as it cooled. Hopefully, it’ll be fine fingers crossed

I’m going to microwave it later today to dry it out better. If someone has suggestions for improvements, I’m all ears! :slight_smile:

Now all that’s left is to figure out is where I need to wire the microwave to control it with the temperature controller I made. Here’s a picture of the schematics:

Microwave Schematics
PCB schematics

Control-Transformer Schematics (not sure how relevant this one is)

I inspected the circuitry and it seems like there’s some safety switches in there (marked with stars in the first schematic) that open the circuit when the door is open which is a good idea and I’d like to keep for safety purposes.

Any thoughts on where I should change the circuit?

Ok I inspected the schematic more and I made some notes:


Before I go shorting everything I’d like to get a second opinion.

My hypothesis’:

  1. Short circuiting connectors 5 (WHT wire) and 3 (BLU wire) to bypass the Main Relay (RY1) on the printed circuit board (PCB) would be useful because then the lamp, fan motor and turntable motor should all be running when the door is closed.

  2. Bypassing the Second Switch Power Relay (RY2) on the PCB would allow my temperature controller to power the magnetron directly.

After shorting it together I think all that’s left is to drill a hole into the top of the microwave and top of the insulation just large enough for the 3mm thermocouple to slip through.

Let me know what you think!

MICROWAVE SAFETY WARNING!!!

I advise against modifying a microwave, as it is a good way to kill yourself, the high voltage transformer is one piece of equipment that can be used to make litchenburg etchings, (100kvolts can burn through wood, or kill you instantly.)
image

Microwave are not designed to contain such heat, if the bottom is likely made of stainless sheet metal, but if your crucible overheats it could either:

  • deform the sheet metal from overheating
  • heat up the material or counter under the bottom
  • cause the crucible to tip over from the shifting of the sheet metal

If you start a fire, you could release potentially deadly fumes from the materials used in the magnetron.

You can put metals in a microwave, the issue is that if there isn’t enough other stuff in the microwave to readily absorb the energy, it can start to arch out between the metal and the metal interior. Or worse use, cause it to feedback upon the magnetron and short it out causing a fire.

AN ALTNERATIVE!!!
I have used one of these table top furnaces before as a burn out oven when i was doing investment casting burnout for aluminum smelting

Able to be programmed to a set temeprature, and even with a set temperature ramp up, and ramp down to control the cooling (critical to ensure it doesnt suffer thermal shock)

-> https://www.tabletopfurnace.com/
I have used this brand before, works reliably and i recommend it.

$500, does the job, does it safely, does it better.,

Here is one for $315 (cant attest to the quality) -> https://megadepot.com/product/hardin-hd-234ss-steel-tabletop-melting-furnace-with-2-kg-crucible

Hell if it keeps you from going down this microwave path, ill bring my own propane furnace equipment + crucibles + safety equipment, all you would need to do is program a servo to control the gas regulator to control the temperature you want.

I even have this high temp thermocouple that can withstand the heat in question -> https://www.amazon.com/gp/product/B00GN7VV8O/ref=ppx_yo_dt_b_search_asin_title?ie=UTF8&psc=1

////
as a side note i came across this company called Pi-plates, have some fun accessory boards for the raspberry pi for control systems like this, not a bad price, and im finding myself wanting to use them more and more.

-> https://pi-plates.com/thermoplate/ (reads K and J type thermocouples)$39.99
-> https://pi-plates.com/motorr1/ (controls 2 steppers, or 4 dc motors)(15vdc 1.2amp )$34.99

Hi James,
I appreciate your concern but I’m already aware of those safety issues and have placed safe guards in place. In fact, I modified the microwave wiring yesterday and it works exactly as I thought! :smiley:

In regards to your safety concerns, the transformer (as well as all the other components) are grounded to the metal casing and I need to check the specs again but the transformer should raise the voltage to only a few kV, not a 100kV.

To contain the high temperatures, I made some fiberglass insulation to surround the crucibles (see pictures above) so the microwave itself will never get too hot. In fact, this microwave has a temperature sensor that shuts the microwave off if it detects 90C or higher so the insulation is required. I need to check again, but I’m pretty sure I recall seeing a fire extinguisher on/near the door in the lab space as well.

I’m also aware that you need to put microwave absorbers into the microwave, that’s why I’m using a SiC crucible which weighs ~100 g and will absorb microwaves and heat my sample.

The only change I’m making is the plaster of paris casing on the insulation I’m using seems to let off some dust as it is heated which is unacceptable so I’m going to get some more water glass and fix them properly.

I really appreciate your concern, but I’ve thought about this a lot and why I’m doing it and I’ve spent a lot of time thinking about safety as well.

1 Like

P.S. I checked the lab yesterday, there is a fire extinguisher on the door.

Hey y’all, I’ve noticed that the SiC crucible I have tends to leave some SiC dust on everything it touches. I’m going to give it a good polish, but is that normal? Ideally, I’d like the SiC crucible to not contaminate my powder samples. If anyone has a longer term solution to prevent SiC dust contamination then please let me know! Maybe spray a dilute water glass solution? @EricP: Any thoughts?